- Coffee Makers[10]
- Yogurt Makers[1]
- Other Kitchen Appliances[6]
- Chocolate Fountains[4]
- Ice Cream Makers[8]
- Waffle Makers[1]
- Toasters[7]
- Electric Kettles[7]
- Sandwich Makers[6]
- Popcorn Makers[1]
- Snack Machinery[1]
- Cookware Sets[1]
- Woks[5]
- Food Processors[3]
- Blenders[4]
- Kitchen Knives[2]
- Openers[2]
- BBQ Grills[3]
- Vacuum Cleaners[7]
- Contact Person : Mr. wang iris
- Company Name : J&R Electronics Co., Ltd.
- Tel : 86-20-38797511-83
- Fax : 86-20-38796959
- Address : Guangdong,GuangZhou,8/i, ChengJian Building, 189 West TiYu Road, TianHe District
- Country/Region : China
- Zip : 510620
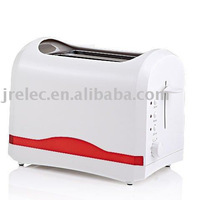
Electric Toaster
Electric Toaster
1.100-240V~60/50Hz, 750W
2.Defrost/Reheat/Cancel3.Function control by one touch button4.Power on indicator
5.Cool Touch Housing6.Soft Touch control switch for browning control and Cancel function7.wide lever8.Power on indicator with LED light9.38mm wide slot10.Self Adjusting bread guides
Packing:
Gift Box:24.8*18.5*18.5(W/O bun warmer)Carton: 56.9*27.5*40.6CM6pcs/Export CartonG.W./N.W.:8.2/7.0KGSQty. / 20': 2860pcsQty. / 40': 5760pcsQty. / 40'HQ: 6720pcs
BREAD TOASTER INSTRUCTIONS
1.Bread Slots3.Toast Brownness Control / Cancel Button2.Carriage Lowering Lever4.Slide Out Crumb Tray
Operating Instructions
Setup1.Place the appliance on a firm and level surface. Do not place on any metal surface such as the sink or draining board.2.Fully unwind the power cord and ensure it is not in contact with the toasters body.3.Plug into a standard domestic power point and switch on.Toasting1.Take two slices of standard sized flat bread and place one piece of bread into each bread slot.Note: Always toast two pieces of bread. Never leave one side empty.
2.Start the toasting cycle by pushing the Carriage Lowering Lever down until a "click" is heard. The bread will be automatically centred for a uniform toasting.
Note: The lever will not stay down if the power is not switched on.
3.Select the level of toasting with the Toast Brownness Control button.Press and release the button repeatedly until the desired setting is required between 1 and 6. Each press will advance the setting by 1 increment.
Note: Depending on the bread type will determine the setting required. i.e. White bread will take at a different time to brown compared to brown bread, etc.
4.After the selected toasting time, the appliance will switch off power to the elements automatically and the toast will pop up.
5.The toaster remembers the previous selecting setting. To change this setting, push the Carriage Lowering Lever down until a "click" is heard and then repeatedly press the Toast Brownness Control button until the desired setting is achieved.
Note: Allow Toaster to cool for 10 - 20 seconds before beginning the next toasting cycle. This permits the thermal control to reset properly for the next toasting cycle.Cancel Function1.The Cancel function allows the interruption of the toasting cycle. To do this, press in and hold the Toast Brownness Control button for approximately 3 seconds.
2.The cycle will stop and the Bread / Toast will pop up.After Use1.Once you have finished using the appliance, unplug from the mains power point and allow to cool completely.
2.Store the cable back in the base of the appliance.Cleaning1.Before cleaning the appliance, ensure it is disconnected from the power supply and has cooled down completely2.Do not use harsh cleaning solutions, abrasive cleansers or metal scouring pads.3.Do not immerse the appliance in any liquid ,To clean the exterior, a slightly damp, lint-free cloth may be used4.Wipe the Base with a damp cloth. Do not immerse in liquid and do not use.
Note: Do Not place any parts in a Dishwasher.
Do Not try to clean the inside of the Toaster, as this may damage the heating Elements.Water and liquids must never Enter the toaster.Crumb Tray1.This appliance has a tray which allows the crumbs to be caught inside the appliance.2.Remove the crumb tray by sliding out from the side of the appliance
3.Empty the contents of the tray.4.Hold the appliance on its side (crumb tray opening down) and gently shake the appliance to eliminate any other bread crumbs still inside the appliance.5.Replace the crumb tray by sliding back in fully.
Note: Never use the appliance without the crumb tray fitted properly
Electric Toaster


